Two Pointer Technique in DSA
Last modified - 05-08-2026
Author - Krishna Shinde
When you start your journey as a beginner in Data Structures and Algorithms, you will encounter various array-solving patterns, and one of the most powerful ones is the Two Pointer Technique. In this tutorial, we will deep dive into the Two Pointer concept in DSA and provide codes of the Two Pointer approach in C++ to help you understand it better.
If you've been going through a C++ tutorial or any set of coding tutorials for beginners, you've probably noticed that a huge chunk of array and string problems, on LeetCode, GeeksforGeeks, or in actual coding interviews, can be solved faster and cleaner once you recognize this one pattern.
This C++ language tutorial focuses entirely on the Two Pointer approach: what it is, how it works, when to use it, and how it compares to the brute-force way most beginners start with.
By the end of this article, you'll be comfortable spotting a Two Pointer problem the moment you see it, instead of reaching for nested loops out of habit.
Table of Contents
- What Is the Two Pointer Technique?
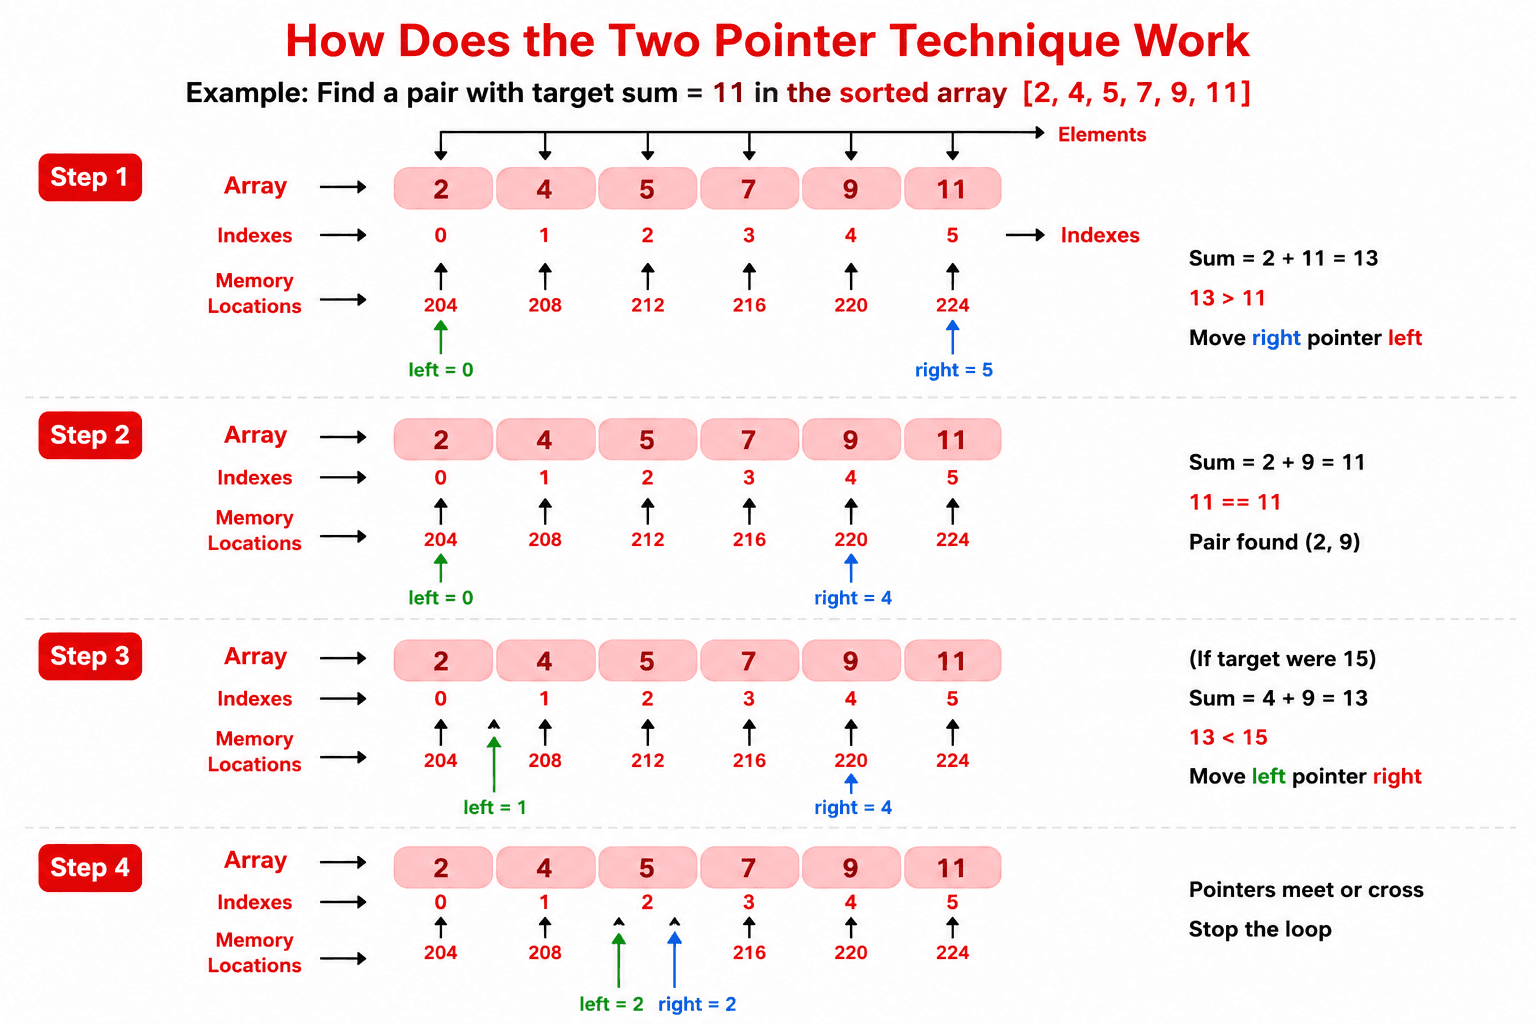
- How Does the Two Pointer Approach Work?
- Types of Two Pointer Patterns
- Two Pointer C++ Programs
- Time Complexity of the Two Pointer Technique
- Two Pointer Example Step by Step
- Advantages and Disadvantages
- When to Use the Two Pointer Technique?
- Common Two Pointer Interview Problems
- Conclusion
What Is the Two Pointer Technique?
The Two Pointer Technique is a problem-solving pattern used mainly on arrays and strings (usually sorted ones) where you use two index variables, or "pointers", to traverse the data structure instead of one. Rather than checking every possible pair with a nested loop, which costs O(n²) time, the two pointers move intelligently based on a condition, which usually brings the time complexity down to O(n).
Think of it like two people starting from different positions in a line and walking toward each other (or in the same direction) based on a rule, instead of one person checking everyone against everyone else.
How Does the Two Pointer Approach Work
Here's a step-by-step explanation of the Two Pointer technique:
- Initialize two pointers, typically one at the start of the array (left) and one at the end (right), or both at the start moving at different speeds.
- Check the condition of the problem using the values at both pointers.
- If the condition is satisfied, record or return the result.
- If not, move one or both pointers based on the logic of the problem, for example, move the left pointer forward if the sum is too small, or move the right pointer backward if the sum is too large.
- Repeat steps 2-4 until the pointers meet or cross each other.
- Return the final result once the traversal is complete.
Types of Two Pointer Patterns
Not every Two Pointer problem looks the same. In DSA, this pattern usually shows up in two main forms:
1. Opposite Direction (Converging Pointers)
One pointer starts at the beginning, the other at the end, and they move toward each other. This is the classic pattern used in problems like checking if a sorted array has a pair with a given sum, or checking if a string is a palindrome.
2. Same Direction (Fast and Slow Pointers)
Both pointers start from the same side, but one moves faster than the other. This pattern is common in problems like removing duplicates from a sorted array, or detecting cycles in a linked list.
Two Pointer C++ Programs
Here are three clean, runnable C++ examples that show the Two Pointer technique applied to three different kinds of problems, since this pattern shows up in more than one shape.
Example 1: Pair Sum in a Sorted Array (Opposite Direction)
This is the classic converging-pointers example: check whether a sorted array has a pair of elements that add up to a given target sum.
#include <iostream>
using namespace std;

int main() {
    int arr[] = {2, 7, 11, 15, 20};
    int n = 5;
    int target = 26;

    int left = 0, right = n - 1;
    bool found = false;

    while (left < right) {
        int sum = arr[left] + arr[right];

        if (sum == target) {
            cout << "Pair found: " << arr[left] << " + " << arr[right] << " = " << target << endl;
            found = true;
            break;
        } else if (sum < target) {
            left++;
        } else {
            right--;
        }
    }

    if (!found) {
        cout << "No pair found with the given sum." << endl;
    }

    return 0;
}
Output:
Pair found: 11 + 15 = 26Notice how this program never checks every possible pair. It only makes at most n comparisons, instead of the n² comparisons a brute-force nested loop would require.
Example 2: Valid Palindrome Check (Opposite Direction)
Another common use of converging pointers: checking whether a string reads the same forwards and backwards, without using any extra space for a reversed copy.
#include <iostream>
using namespace std;

int main() {
    string s = "racecar";

    int left = 0, right = s.length() - 1;
    bool isPalindrome = true;

    while (left < right) {
        if (s[left] != s[right]) {
            isPalindrome = false;
            break;
        }
        left++;
        right--;
    }

    if (isPalindrome) {
        cout << s << " is a palindrome." << endl;
    } else {
        cout << s << " is not a palindrome." << endl;
    }

    return 0;
}
Output:
racecar is a palindrome.Instead of reversing the string and comparing it to the original, which costs extra space, the two pointers check characters from both ends and meet in the middle.
Example 3: Remove Duplicates from a Sorted Array (Same Direction)
This example uses the fast-and-slow pointer pattern instead of the converging one. Both pointers start from the same side, but move at different speeds, to remove duplicates in place.
#include <iostream>
using namespace std;

int main() {
    int arr[] = {1, 1, 2, 2, 3, 4, 4, 5};
    int n = 8;

    int slow = 0;

    for (int fast = 1; fast < n; fast++) {
        if (arr[fast] != arr[slow]) {
            slow++;
            arr[slow] = arr[fast];
        }
    }

    cout << "Array after removing duplicates: ";
    for (int i = 0; i <= slow; i++) {
        cout << arr[i] << " ";
    }
    cout << endl;

    return 0;
}
Output:
Array after removing duplicates: 1 2 3 4 5Here, the slow pointer marks the last position of the unique portion of the array, while the fast pointer scans ahead looking for the next new value. This runs in a single O(n) pass with no extra array needed.
Time Complexity of the Two Pointer Technique
| Case | Time Complexity | Space Complexity | Notes |
|---|---|---|---|
| Brute Force (Nested Loop) | O(n²) | O(1) | Checks every pair |
| Two Pointer (Sorted Array) | O(n) | O(1) | Single pass, no extra space |
| Two Pointer + Sorting | O(n log n) | O(1) or O(n) | If array isn't sorted yet |
Two Pointer Example Step by Step
Let's do a manual run-through of the Two Pointer technique with the array:[2, 7, 11, 15, 20] and target sum = 26.
- Initial setup: left = 0 (value 2), right = 4 (value 20)
- Step 1: sum = 2 + 20 = 22 → less than 26 → move left pointer forward
- Step 2: left = 1 (value 7), right = 4 (value 20) → sum = 27 → greater than 26 → move right pointer backward
- Step 3: left = 1 (value 7), right = 3 (value 15) → sum = 22 → less than 26 → move left pointer forward
- Step 4: left = 2 (value 11), right = 3 (value 15) → sum = 26 → match found
Pair found: 11 and 15, in just four comparisons instead of checking all ten possible pairs a brute-force approach would need.
Advantages and Disadvantages of the Two Pointer Technique
Advantages:
- Reduces time complexity from O(n²) to O(n) in most array and string problems.
- Uses constant extra space, since no additional data structures are usually needed.
- Simple to implement once the underlying pattern is recognized.
- Frequently asked in coding interviews, so mastering it pays off directly.
Disadvantages:
- Usually requires the array to be sorted first, which can add O(n log n) overhead if it isn't already.
- Not applicable to every problem; it only works when there's a clear monotonic relationship to exploit.
- Choosing the wrong movement rule for the pointers can lead to incorrect or infinite loops if not handled carefully.
When to Use the Two Pointer Technique?
The Two Pointer approach is not a universal fix, but it shines in scenarios like:
- Finding pairs or triplets in a sorted array that satisfy a sum condition.
- Checking whether a string or array is a palindrome.
- Removing duplicates from a sorted array in place.
- Merging two sorted arrays efficiently.
- Solving sliding window style problems, which are essentially an extension of the Two Pointer idea.
In professional coding interviews, recognizing that a problem can be solved with two pointers instead of a nested loop is often the difference between a brute-force answer and an optimal one, and interviewers notice that.
Common Two Pointer Interview Problems
If you want to practice this pattern, these are some of the most commonly asked Two Pointer problems in DSA interviews:
- Two Sum II (sorted array input)
- Valid Palindrome
- Container With Most Water
- Remove Duplicates from Sorted Array
- 3Sum (an extension using two pointers inside a loop)
- Trapping Rain Water
Conclusion
The Two Pointer Technique is one of those patterns in Data Structures and Algorithms that, once it clicks, you start seeing it everywhere. It takes what would otherwise be a slow, nested-loop brute-force solution and turns it into a single, efficient pass through the array. Mastering it is one of the best time investments you can make while working through arrays in any C++ tutorial.
Keep practicing by tweaking the examples above: change the target sum, try it on an unsorted array after sorting it first, or apply the same-direction version to a duplicate-removal problem. That kind of hands-on repetition is exactly what makes concepts stick in coding tutorials.
We've already written an article on Arrays in DSA, and you can explore our full DSA tutorial blogs for more. Follow AlgoFlame for more programming content.